How to harvest tomato seed? It isn't the standard cut and dry method. It's a wet fermentation method...
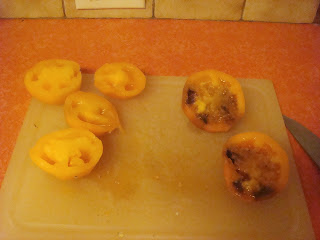
You need a couple tomatoes, a fermenting jar, a knife and cutting surface. Note the bigger tomato on the left- it has bruising.. the one on the right is an overripe but still good tomato.
The larger and more bruised/damaged one shows it inside. You don't want any blackened icky portions of seed when you go to save. The halves on the left show what the insides should look like for saving.
And here's a pic of the outsides of the same tomatoes.
Your seed cavities should look fully healthy like this.
Don't try to save any of this unless it's a really rare and you can't get more/better any time soon. Then I might say save some of the yellowest goo bits.
This is how much goo came out of the two tomatoes on the left into the jar.
This is how much water I added.Now I capped the jar with a used lid and ring, set it on the counter to ferment..for a week. Make sure the cap isn't air tight- you want a little air to get in there to help with the fermentation.
So, here it is a week later... October 23.
Took the cap off and here we have a fine scum on the top. This is a good thing.
This is a side view, I sloshed a bit of the scum up onto the side of the glass, oops. Notice the light upper layer, and the darker bottom layer with the dots in it? Those dots are the seeds :)
After carefully pulling the scum off the top as you can, pour the liquid into a strainer. This is the goo before starting to rinse.
And here's the same mass after rinsing. Kind of rub the seeds against the mesh a bit to help any clinging goo to come off and go through the mesh away from the seed. It's ok if they aren't perfect clean, but you shouldn't have much goo there.
Drop your cleaned seed into a dish and tuck away in a warm, dry, and safe spot and let totally dry before packing up. You might want to stir the seeds a couple times while drying to make sure they all get separated.


No comments:
Post a Comment