Well, it's the end of the year....
Of course the obvious high of the year was our wedding. I'm still grateful and amazed at how wonderful that was and the generosity of everyone involved. Especially Mama N for taking a long forcasted horrid winter weather weekend and giving us an impeccable warm and beautiful spring weekend. It was truly a party amongst loved ones and was perfect.
Scored some points in the yard, getting the luffas to work, the bumper crop of beans, putting in our first raised bed, cleaning up the solarium beds... Also lost some points in the not taking care of the orchard again, and not getting the flowers in the sanctuary to work, and having such problems with all the container growing.
To date, and there is still a chance of more seeds coming in the mail today...
Growbox Hill now has a breeding base of 360 seeds. We donated 220 packets of seed to new gardeners in 2013. Scrambled the whole trade list, but I know we traded in and out dozens of packets of seed. Currently under 200 seeds on my wishlist, lol- I'm sure that will change once I get my bean and tomato seed swaps in and look through the new seed catalogs.
Had some fine culinary accomplishments this year. Canning has turned out to be a wonderful experience, though I'm particularly pleased with the wild gathering and making of blackberry jelly and the salsa I gathered ingredients from several produce sellers to make. Discovered the joy of making homemade horseradish and tahini. Figured out making my own dinner kits.
Tikki came into our home this year, and boy what a difference from when we first rescued her to today! She is a right plump little thing now, sweet as she wants to be. Still not getting along great with the other kitties, but slowly things are looking like they will be fine.
2013 was a good year. A good setup year, a good learning year.
Looking forward to 2014 though. I don't really have resolutions, but I do have things I want to accomplish.
I want to try wintersowing this year. I've been wanting to do this before, but 2014 will be the first time I really have the resources and seeds for doing it. Primary target this year will be flowers.
Want to get some progress done in the sanctuary- get flowers established.
Want to get 2 raised beds set up this year. Now that I filled the first box with garlic, I realize I will probably always have a garlic box. Maybe we can squeeze 3 beds.
I want to finally, really get the orchard cleaned up. It's been way overdue for way too long. I want good, edible, useable fruit in 2014!
Want to build/obtain a cider press.
Want to paint the interior of the house.
Want to get the garage fixed or shored up, and the solarium skylight repaired.
Want to make the top gate for the basement door and set up the salt teat system.
Want to get the beehive setup accomplished this year so we can put in a nuc in 2015! By this I mean the bee patio finished, including the beehive and accoutrements. I'm thinking of doing a traditional Langstroth hive and a Mason Jar Observation hive, which is pretty much a Langstroth with a bunch of mason jars on top. Pretty darn neat.
Want to get one alternative energy project set up. Don't care what it is, but I do think we should apply it to the power source for our well. We can progress from there :)
Will likely slow down on the seed collecting in 2014. I do ultimately have goals of storing more kinds of seed, but considering I have over 100 more kinds of seed than my initial goals in January of this year.. Whew, I need to do some sorting and growing out of a lot of stuff to catch up!
Will likely get a handle on the raspberry patch- or at least sweat and swear a lot over it. Considering how much better the raspberry patch is down at the corner, I'm seriously thinking about just grooming in that chunk and doing something else entirely with the current patch. What, I don't know.
So now it's afternoon on New Years Eve. I'm not sorry to see 2013 go, but I'm not thanking heavens it's over, hahahaha. I'm grateful I've had a year full of love and good things, friends and family, experiencing cool things.
Hope everyone has a safe and wonderful evening... We will see you in 2014! Cheers!!
Welcome to Growbox Hill

Welcome to Growbox HIll!
Tuesday, December 31, 2013
Tuesday, December 10, 2013
Making stuff for the holidays...
Started Thursday, December 5th..
Heh, we got in so much snow last Wednesday we couldn't leave the house for Thanksgiving.. Yesterday saw the 50's and mostly melt off.. Tonight kicks off freezing temps for days.
As per usual, now is the end game time for getting Christmas shopping and gift making done... I try to make more than I buy. Quite often baked goods and seasoning mixes, and we usually make an ornament or few.
So far the luffas are all sorted out and in a couple bags to get strung up or packed up. Picked up a couple random bits for the boys. Of course there are jars of goodies in the basement too :)
Been tinkering with some gift in a jar stuff... Tried a sesame cracker that was pretty underwhelming, and a cranberry hazelnut cracker that was pretty good- but I wouldn't really call it a cracker. I didn't have cranberries so I chopped up a few prunes instead. Yes, prunes, and it was tasty. Don't think I would use either for gifts.
Made up a few batches of jambalaya rice mix for our pantry. We like to eat rice with beans and/or sausage pretty often, and the grocery mixes are just too darn expensive. I didn't have any chives on hand like the recipe suggested, so I used a mix of parsley and dehydrated radish greens. And ground my own celery flake too. I just keep em in little ziplocks in a jar for my pantry :) But now that I've resupplied the larder, I'll make up a couple of these in jars for gifts too.
Tried out a hearty Italian style bean soup.... It's more of a thick stew. Very tasty. I made a few presentation jars of that one, they just need their instruction tag and pretty cloth cover. Think I might make a couple of these for our pantry shelf too.
Made a few Spicy mushroom and corn quinoa spice mix kits. Those turned out nice enough I'm considering making a few of those for our pantry too :)
Started baking. I desperately need a small chest freezer damn it. And I dropped my nutmeg mill and shattered it- may angels and demons weep. Life sort of shrivels up without freshly milled nutmeg.
But got a batch of regular chocolate chip cookies done- And they turned out different than usual because I used the homemade dark brown sugar. They taste great though. But I do need to tinker with that ratio quite a bit, and I need to make more brown sugar too.
Also pulled from the freezer and baked up the bar of Nutella cookies. Those turned out exactly as they should :)
Now I just need to make up a third batch of something and off into the mail that bit will go. Not sure what it will be, But I'll be baking it tomorrow.
Started out this morning taking the mushrooms I got on clearance off the dehydrator- oyster and button. Spent a crying hour prepping up a full load of fresh onions to dehydrate. I clean and chunk them, then mini process them fairly fine before spreading onto jelly sheets. I'm almost out of dried minced onion from making up gifts and mixes and onions have been on sale recently. A little work and I pay about 2 bucks to refill a container that sold for 5-7 bucks. And it gives a little low gentle heating on this side of the house during the day and night for the few pennies it costs to run the dehydrator.
Quick cooked up a batch of dried small red beans to dehydrate once the onions are done. Did I just say I dried cooked dried beans? Yeppers.
Dried beans in the bag are dried from fresh, and require a goodly cooking before they are edible. But there are 30 minute dried mixes with beans, how is that? Because they cook the beans, then dehydrate them. After a lot of reading around, I decided that making my own beans from dried before dehydrating would be better than using canned beans for the final product. And it's cheaper- Once a 1.29 bag of dried red beans is cooked up, fills the colander like 4 cans of beans. No way I'm picking up canned beans for 30 cents a can. But dehydrated beans can cook up just like canned beans do- fast or slow cooking, though with some slow cooking additional fresh addition of canned is good.
Used the standard quick instructions on the bag- cover beans well with water, bring to boil, let boil 2 min, kill heat and cover. Let sit one hour.
Fully drain and refill water, cover, and simmer for 2-3 hours, till tender.
From there I let steep for a half hour before draining and rinsing. Already small cracks and splits are appearing on the skins- but not like I care about that. All of them are still very whole and seem like they will stand up that way on drying AND they are very tender. Now it's just hurry up and wait till the onions are done. The beans might have to go into the fridge overnight.
Picked up a beautiful 3 lb rib end pork roast for a buck a pound yesterday. Today it is being brazed up with onion, garlic, and baby carrots, with mashed taters for the starch.
It's Saturday!
Yesterday I made up a batch of spinach and white beans for dinner tonight. And a set of lemon mini-loaves. Threw a pork roast in a crockpot this morning. Today I did mini carrot loaves and sour cream loaves. Cream cheese frosting, spiced honey butter and sweet citrus butter. Gotta wait for the bananas to brown to make the last loaf for the sweet quartet, banana squash loaf.
Also trying out a clementine marmalade that takes a couple days to steep before making into the final product.
Now it's Monday... I really got to get better at putting up notes, hahaha.
Finally caved in a ordered a nutmeg grinder over the weekend- it's my gift from my hubby, I think he got sick of hearing me whine about it.
Broke in my pasta cutter- gunked up my pasta cutter, lol. The main rolling machine is good, but the pasta was way too sticky for the fine cutting attachment. So much for lovely pasta nests for Christmas, hahaha. Still might try orecchiette or perhaps tagliatelle.
Decided to go for the ecig thing. Picked up a couple of disposables last week and we tried them out. Pretty good, but then we had tried a friends ecig a while back and liked that. Over the weekend we picked up a couple of less expensive refillable ecigs. One pack of smokes is 7.30-7.50 and lasts a day or two. One package of refills for the ecig was 6 bucks and had 4 refills, equaling 8 packs of smokes. The main part of it was a 16 dollar kit- the tube and it charges on a USB port. No shit.
We hope to be totally ecig by the holiday weekend. It's way cheaper. Once you figure out pack price, I don't think I saw smokes that cheap as a kid. And it does not stink like cigs, or leave compounds all over. And it can be done where cigs can't anymore, like eateries and pubs.
Yeah, the best solution is to not use the stuff at all. But it's a good step.
Going onto ecigs is a little bit baffling at first. There are a lot of brands, flavors, disposables vs refillables, and different levels of strength just like smokes have full flavor or lites.
Gonna post this now since it's already Tuesday night...
Friday, November 29, 2013
Thanksgiving snow...
Wow, we thought the early snow and the power snapping storm were icky..
Looks like we have our first snow in for Thanksgiving. Our plans were to head out in the morning with goodies in hand to bring to the feast... But woke up this morning and that sort of changed.
Wasn't so bad when we first got up. Wow, we got some snow everything is pretty and white, looks a bit like a snowglobe :) Then this kept up all day long. We did have a brief break around three that made me hopeful, but those hopes have been dashed by darkfall around 6.


 Around oneish time- by the time the sun set, there was at least another two inches piled up.

 A couple attempts to take pics of the snow gusts blowing around.

 A bit fat dove alighting on the tree in hopes that I filled the feeder.
 This is what it looked like up to the break around 3... After that we got in a couple more inches of stack up and swirl around by sunset.The spattering on the screen isn't from us- it's from the wind smacking a ton of snow around. I'll likely take more pics in the morning.
Yesterday I made from scratch wheat tortilla chips. Pan toasted them in bacon grease, cut them up, then toasted them to chips in a 300 degree oven. This was after I somehow completely screwed up a batch of pita bread- it proved to be a PITA, hahahhaha. Today I made up a party sized batch of hummus. Good thing hummus freezes exceptionally well.
Decided to make a scalloped butternut squash and ham casserole for dinner tonight- it was kind of a nice excuse to run the oven off and on all day, lol. And a good comfort food on a snowy day like this.
And we were officially snowed on on Thanksgiving. It was a total bummer not to see the family for the holiday :(
I did try to pull together a special dinner here though. Made duck, mushroom, and brown rice casserole, mashed sweet potatoes and butternut squash, and blueberry-raspberry crumbles for dessert. Plus the hummus and whole wheat tortilla chips I made :) We were well stuffed!
So belated Thanksgiving wishes everyone- hope the holiday was good and safe for you!
Looks like we have our first snow in for Thanksgiving. Our plans were to head out in the morning with goodies in hand to bring to the feast... But woke up this morning and that sort of changed.
Wasn't so bad when we first got up. Wow, we got some snow everything is pretty and white, looks a bit like a snowglobe :) Then this kept up all day long. We did have a brief break around three that made me hopeful, but those hopes have been dashed by darkfall around 6.


Yesterday I made from scratch wheat tortilla chips. Pan toasted them in bacon grease, cut them up, then toasted them to chips in a 300 degree oven. This was after I somehow completely screwed up a batch of pita bread- it proved to be a PITA, hahahhaha. Today I made up a party sized batch of hummus. Good thing hummus freezes exceptionally well.
Decided to make a scalloped butternut squash and ham casserole for dinner tonight- it was kind of a nice excuse to run the oven off and on all day, lol. And a good comfort food on a snowy day like this.
And we were officially snowed on on Thanksgiving. It was a total bummer not to see the family for the holiday :(
I did try to pull together a special dinner here though. Made duck, mushroom, and brown rice casserole, mashed sweet potatoes and butternut squash, and blueberry-raspberry crumbles for dessert. Plus the hummus and whole wheat tortilla chips I made :) We were well stuffed!
So belated Thanksgiving wishes everyone- hope the holiday was good and safe for you!
Thursday, November 21, 2013
BAAAD weather!!
Well then, we had ourselves a nasty November spell. Swathing all the way from Tennessee up to the UP. Tornadoes, nasty storms... An upper 60's front driven by a nower 40's front.
It was truly terrible for about a whole 35 minutes from first flush till watery sun started breaking out of the sky.
On a yay note- that radio I paid 15 buck for a couple weeks back really paid itself off- the power died, and the batteries picked up without a hiccup. We were able to keep tuned into the weather after we lost power :) There was a goodly bit of destruction according to reports!
I hate winter power outages- made me super happy we got power back this afternoon, about 24 hours after it went out :) We were figuring sometime tomorrow at the soonest.
We tried out tealight heaters. That's when you take a loaf pan, a couple terra cotta pots, and some tealights to make a little heater. They worked rather nicely for a desk and countertop heater- fortunately, we got power back before needing to see how well they would work in our bedroom.
Got the chance to put plastic up over 3 of the 4 office windows. Really making a difference!
The luffa experiments... Well, the bleaching process went well enough that I felt encouraged to pick the dozen still on the vine that felt "fibrous" enough to pick. I think I left about 10 on the vine that were too squishy to be of use. And I'm really liking using a segment at the kitchen sink- though I think I need to cut some of the rest up a bit longer in segments for a bit bigger sponge. So those all got picked, peeled, and put into bleach solution to sit for a day or few :)
Got in a whole heap of seeds for the Christmas bag, woot! And a couple more big swaps coming in still. And the seed catalogs are starting to come in, so I get to compile a 2014 wishlist :) I'm sure it will be considerably shorter than the 2013 list was. I have quite a bit of growing to do next year to catch up on the going out growing stock!
Next year is going to be a lot of drying beans, perhaps some small gourds. I think I'm going to do up a full round of black tomatoes in the kitty buckets. A lot of greens experiments. Need to figure out if we can set up a spring raised bed or two for early root veggies and perhaps peas. A shitton of flower seeds for wintersowing experimenting.
Luckly enough, we have been saving up a heap of 1 gallon milk jugs and other big plastic jugs for the project. Still need a LOT of regular bagged dirt and perhaps a bale or few of straw to work in with the compost pile.
I think I want to re-arrange the chicken kennel walls/doors. I want to move the center wall to the south wall position. Move the middle door to the south too. Sort of prelim setup into eventual chicken space there. We only want a half dozen at most chickens- well and plenty for eggs and a couple hens in the pot every cutting season. And a lot of goodly bug control, especially ticks!
But I want to blend the back couple spaces into the eventual coop footprint, and gate in the southmost area securely for plant growing and perhaps some storage. Now that I think I have an idea on how to handle the area, time to start setting up with with what we got.
We have come a long way with the cats since we first brought Tikki into the house. She also responds well to twitchywitchy, lol. We've promised Pooks no more new kitties till well after he is resting next to Moon :)
I found some inspiration the other day with this link: http://themetapicture.com/if-youre-only-going-to-read-one-thing-today-read-this/
It's a story about a man who adopts a dog... and a ways into the troubled relationship when he is just about to give up and is willing to return the dog to the pound is reminded that this pet they got was someone elses companion first, and might need extra patience via a letter from the surrendering owner that the guy didn't open till just before he was going to give his new companion up.
Saturday, November 16, 2013
winter produce and green luffas
Since it's that time of year... Let's chat a little about winter curbits. Pumpkins and hard shell squashes, gourds as well.
Ever consider drying your pumpkins and squashes? You can rehydrate it and use it in place of canned pumpkin, replace up to a 1/4 of the flour in quickbread recipes with pumpkin flour, add it as a thickener in some dishes, sprinkle a dusting onto other dishes for an extra hit of hidden veggies.. If you use particularly sweet pie pumpkins you can sprinkle on your oatmeal :)
Last year I cooked up and dehydrated up a ton of winter curbits- 2 medium carving pumpkins, one large delecata, one large dumpling, 5 small to medium buttercups, 1 large green and 2 small golden acorn squashes, 1 medium large (filled the pan in it's own roasting) and 1 small butternut squash. I have no idea how many pounds that all is before dehydration. The result of the process filled one 16 oz recycled dry roasted peanut jar. And it stores exceptionally well.
Keep your whole squashes longer by NOT keeping them on the kitchen counter or in the fridge or in an uninsulated garage. Winter squashes need cool, dim, and DRY storage conditions.
All seeds of the common curbit family are edible. From pumpkins to acorns, butternut to those big ass seeds from that green thing you picked up the other day. Yep, you can roast them up and eat them just like pumpkin seeds. Just depends on if you think it worth it or not- if you eat only the seed meats, if the shell can be left on or must be taken off, ect.
Why yes, you can indeed eat jack o lantern pumpkins. They tend to be much more flavorless and much stringier than eating pumpkins. But you can pick up a couple now to use as pumpkin keggers through to christmas if you store them right- Yes, through christmas- there are white pumpkins or you can paint them for Snowman beverage vessels on the Yule table.
Imagine that snowman pumpkin with a spigot instead of a corn cob pipe.


What curbit is what? Here's a list of common eating squashes at Whats cooking America It has images and descriptions. And all those weird pumpkins and squashes in displays? Those are completely edible too, and far tastier than your average jack o lantern ;)
Gourds... To a great extent, gourds aren't good eats. Their flesh isn't tasty or plentiful, their shells rather hard, and seeds, erm. I grew luffas this year- those are edible while very young like a summer squash, but become more and more inedible as it matures. Yugoslavain Fingers gourd is a notable exception to the general no eat rule- young they are like summer squash, mature they are more like winter squash.
But gourds are wonderful when dried out for craft projects and decor. And depending on what you grow, you can then turn those gourds into food service items, like bowls, spoons, cups- even serving dish sized or garden picking basket sized things.
Green Luffas
Well, here it is after the first serious frost/freeze/snow (all kind of happend at once)... And I got a couple dozen non-mature luffas on the dead vines. They aren't edible immature, too much fiber and seed for that, but they aren't fully black seeded brown skinned mature either. There's lots of info about let them dry, but not much info on what to do if they couldn't go dry on the vine- as in, I live where it snows. Since they already got the freeze so it's too late to pull them before freezing, I decided to experiment and see if I could salvage any of these things. I still have over a dozen on the vine I can either pull in and deal with if needed, or leave out there to winter dry if they don't go to crap.
Pulled 8 luffas on day 1:
First two luffas I peeled, sliced, and laid out on heavy paper to start to dry. One was really wet inside, the other much dryer.
Second two got their skins pierced quite a bit, and laid on heavy paper to start to dry
Luffa 5 got peeled, sliced, and put into the dehydrator at 115 for several hours
Luffa 6 got sliced up unpeeled, put on heavy paper, and into the oven at 200 for 4 hours then left in the oven overnight
The last two didn't get touched at all
 Here's a pic after I peeled the first luffa- Nova is keeping an eye on them to make sure they don't do anything stupid. I peeled over some recycled newspaper to save on mess cleanup.
Day 2:
Luffa 1 already showed mold! The wetter of the two of course.
Luffa 2, the dryer one is showing no mold, but is still fairly damp.
Luffa 3 was so wet and low fiber it needed to be discarded.
Luffa 4 was able to be used, I peeled, cored, and rinsed the sponge well before setting out to air dry.
Luffa 5 looked good enough after coming out of the dehydrator that I tagged and bagged it.
Luffa 6 got peeled this morning, and baking did help make the taking the skin off a tad easier. These are also thinner slices than any of the other segments. They are now air drying.
Luffa 7 was too wet and low fiber to be used
Luffa 8 got segmented and placed in bleach water. 2 oz in the 80 oz recycled sour cream tub. Used a small dish to help keep the pieces submerged before putting the lid on it.
 The back rack has luffa 6, the front right is luffa 2, front left is luffa 4
Day 3:
Luffa 2, looks like it's drying out, showing some browning
Luffa 4, this one is well dried already
Luffa 5, in it's bag sitting next to the other racks, it's noticeably showing it's dried from green color.
Luffa 6, looks like it's drying out nicely. Not showing as much browning as luffa 2.
Luffa 8, did not get opened today, wanted to let it sit 48 hours
Day 4:
Luffa 2, same as yesterday
Luffa 4, this one is fully dried, tagged, and bagged. Used a section today in the kitchen, foamed well, scrubbed well, rinsed out well. Now it's drying to see how well it does there.
Luffa 5, same as yesterday
Luffa 6, same as yesterday
Luffa 8, got drained, cleaned and rinsed, and set out to dry. Don't know if it was the bleach solution, or that this luffa was further along, but I had a remarkably easy time squeezing out all of the seeds leaving the center fiber intact.
Luffa 9: Luffa 8 turned out so well, I picked another off the vine to treat in the same manner to see if I get the same results or not.
 This is what the luffas 8 looked like when I first took the lid off.
 On the back rack is luffa 8 sitting out to air dry. Looks the best overall. In the bag is luffa 5. On the front rack left to right is luffa 4, luffa 6, then luffa 4.
Ever consider drying your pumpkins and squashes? You can rehydrate it and use it in place of canned pumpkin, replace up to a 1/4 of the flour in quickbread recipes with pumpkin flour, add it as a thickener in some dishes, sprinkle a dusting onto other dishes for an extra hit of hidden veggies.. If you use particularly sweet pie pumpkins you can sprinkle on your oatmeal :)
Last year I cooked up and dehydrated up a ton of winter curbits- 2 medium carving pumpkins, one large delecata, one large dumpling, 5 small to medium buttercups, 1 large green and 2 small golden acorn squashes, 1 medium large (filled the pan in it's own roasting) and 1 small butternut squash. I have no idea how many pounds that all is before dehydration. The result of the process filled one 16 oz recycled dry roasted peanut jar. And it stores exceptionally well.
Keep your whole squashes longer by NOT keeping them on the kitchen counter or in the fridge or in an uninsulated garage. Winter squashes need cool, dim, and DRY storage conditions.
All seeds of the common curbit family are edible. From pumpkins to acorns, butternut to those big ass seeds from that green thing you picked up the other day. Yep, you can roast them up and eat them just like pumpkin seeds. Just depends on if you think it worth it or not- if you eat only the seed meats, if the shell can be left on or must be taken off, ect.
Why yes, you can indeed eat jack o lantern pumpkins. They tend to be much more flavorless and much stringier than eating pumpkins. But you can pick up a couple now to use as pumpkin keggers through to christmas if you store them right- Yes, through christmas- there are white pumpkins or you can paint them for Snowman beverage vessels on the Yule table.
Imagine that snowman pumpkin with a spigot instead of a corn cob pipe.


What curbit is what? Here's a list of common eating squashes at Whats cooking America It has images and descriptions. And all those weird pumpkins and squashes in displays? Those are completely edible too, and far tastier than your average jack o lantern ;)
Gourds... To a great extent, gourds aren't good eats. Their flesh isn't tasty or plentiful, their shells rather hard, and seeds, erm. I grew luffas this year- those are edible while very young like a summer squash, but become more and more inedible as it matures. Yugoslavain Fingers gourd is a notable exception to the general no eat rule- young they are like summer squash, mature they are more like winter squash.
But gourds are wonderful when dried out for craft projects and decor. And depending on what you grow, you can then turn those gourds into food service items, like bowls, spoons, cups- even serving dish sized or garden picking basket sized things.
Green Luffas
Well, here it is after the first serious frost/freeze/snow (all kind of happend at once)... And I got a couple dozen non-mature luffas on the dead vines. They aren't edible immature, too much fiber and seed for that, but they aren't fully black seeded brown skinned mature either. There's lots of info about let them dry, but not much info on what to do if they couldn't go dry on the vine- as in, I live where it snows. Since they already got the freeze so it's too late to pull them before freezing, I decided to experiment and see if I could salvage any of these things. I still have over a dozen on the vine I can either pull in and deal with if needed, or leave out there to winter dry if they don't go to crap.
Pulled 8 luffas on day 1:
First two luffas I peeled, sliced, and laid out on heavy paper to start to dry. One was really wet inside, the other much dryer.
Second two got their skins pierced quite a bit, and laid on heavy paper to start to dry
Luffa 5 got peeled, sliced, and put into the dehydrator at 115 for several hours
Luffa 6 got sliced up unpeeled, put on heavy paper, and into the oven at 200 for 4 hours then left in the oven overnight
The last two didn't get touched at all

Day 2:
Luffa 1 already showed mold! The wetter of the two of course.
Luffa 2, the dryer one is showing no mold, but is still fairly damp.
Luffa 3 was so wet and low fiber it needed to be discarded.
Luffa 4 was able to be used, I peeled, cored, and rinsed the sponge well before setting out to air dry.
Luffa 5 looked good enough after coming out of the dehydrator that I tagged and bagged it.
Luffa 6 got peeled this morning, and baking did help make the taking the skin off a tad easier. These are also thinner slices than any of the other segments. They are now air drying.
Luffa 7 was too wet and low fiber to be used
Luffa 8 got segmented and placed in bleach water. 2 oz in the 80 oz recycled sour cream tub. Used a small dish to help keep the pieces submerged before putting the lid on it.

Day 3:
Luffa 2, looks like it's drying out, showing some browning
Luffa 4, this one is well dried already
Luffa 5, in it's bag sitting next to the other racks, it's noticeably showing it's dried from green color.
Luffa 6, looks like it's drying out nicely. Not showing as much browning as luffa 2.
Luffa 8, did not get opened today, wanted to let it sit 48 hours
Day 4:
Luffa 2, same as yesterday
Luffa 4, this one is fully dried, tagged, and bagged. Used a section today in the kitchen, foamed well, scrubbed well, rinsed out well. Now it's drying to see how well it does there.
Luffa 5, same as yesterday
Luffa 6, same as yesterday
Luffa 8, got drained, cleaned and rinsed, and set out to dry. Don't know if it was the bleach solution, or that this luffa was further along, but I had a remarkably easy time squeezing out all of the seeds leaving the center fiber intact.
Luffa 9: Luffa 8 turned out so well, I picked another off the vine to treat in the same manner to see if I get the same results or not.


Thursday, November 14, 2013
First snow of the year
Sort of. We got a serious day of slushy snow a couple weeks back, but it only stuck around for the day- I count that more as the first frost date rather than snow, lol. The new Autumn Maple pic to the right was a couple days after- figured I better capture the moment while it was still good.
But today, November 11th, is for sure the first snow of the season. Started out cold and drizzly, but has progressed over the mid afternoon into a rather firm dusting and it's supposed to keep being like this for the next 24 hours...
So I sucked it up, and went outside in the drizzle to pull all the beets- at this point, they are tender enough that a good snow could screw them, and they ain't gonna produce any sort of big enough to eat root this season anyway. The radishes are doing fine.
Made a mess of greens and white beans for dinner :)
When I last used breadcrumbs, I realized I was almost out. Today I realized I had some bread that had been sitting and really needed to get used up because we actually have a surplus of bread at the moment. So I toasted up a new batch of breadcrumbs. 1 loaf of bread dried up and ground up refills the 15 oz breadcrumb can beautifully if packed.
Started the Christmas seed stocking the other day. I liked having a heap of seeds to open for Christmas last year. So this year I decided to do the same thing- save all my seed collecting from Nov 1st till it's time to pack them up for under the tree. Using a recycled dark green bag from limes, so that will be easy. Already have three trades in it, and I put in seed orders the other day. Seed Savers exchange has a heap of seed for 1.38 a packet! And a whole handful of the sale seed also happened to be on my wish list. Put in a small order to Pinetree, and an order to Artistic Gardens. I focused a lot on my winter curbit wish list- the swap is after the holidays, and I wanted to refill my stock to participate- and I am finally running low on varieties. 28 packs for 25 bucks total all told- that's .89 a pack for a lot of seed I've had on my wish list since the 2013 catalogs came in :) Squee!
I'm also currently in the beans swap- that should come in before the holiday. And tomatoes, though that might come in late enough to count to 2014.
Right now, I'm looking rather hopeful about what Growbox Hill's seeds totals for the years end will look like. We have gotten in a rather astonishing variety this year. We have also sent out quite a bit of newbie seed this year too- over 200 packets and counting :)


November 12 broke with snow... and more snow. We got around 3ish inches. Not too bad though, the sun came out in the early afternoon and already started melting it off the driving surfaces.

Kind of a hrmmmm day, lol.
Realized that I still had a nice package of ground sirloin that I got for cheaper than ground beef out of the manager special case. Well hell, that means either into the freezer NOW, or make it for dinner. I decided it was Salsbury Sirloin for dinner. Ok, so I took a couple salsbury steak and a couple of chopped steak recipes and made my own up.
Salsbury Sirloins- makes 8 steaks
2.75 pounds ground meat
2/3 c breadcrumbs
2 eggs
1 1/2 t dry mustard
1 T worstershire
1 T dried minced garlic
1/2 t white pepper
Mix all that up, and make into 8 croquettes. Toss into the fridge for an hour or so to let it set and dry. Sear them in a couple tablespoons oil, I used grapeseed. You just want to put a "char" on the outsides quickly, and cook them as little as possible. Only do a few at a time to help keep up searing heat, and pull off to a plate to rest as they get done to rest till the gravy is done.
Gravy:
In advance, 2 cup liquid measure filled loosely with uncrumbled dried mushrooms. Fill with hot water and let mushrooms reconstitute. You might want to do this before you even start mixing the meat. Once they are rehydrated, drain off the soaking liquid into a measuring cup to reserve liquid. Squeeze your mushrooms a bit to get most of the liquid out of them.
Take the resulting mushroom liquor and use water to make 2 cups. Add two packets of brown G Washingtons, a couple dashes Worcestershire, and set aside till gravy making time.
1 onion, thinly sliced
2 T butter
4 T flour
2 cups liquid
Don't drain any of the fat after you fry up your steaks. Since sirloin is so lean it yields little fat, and this counts into your gravy roux ratio.
Saute the onions in the butter till soft and starting to carmelize.
Stir in mushrooms
Stir in flour and coat well, allowing the flour to toast up a bit, you should see no white by the time you are done stirring, and keep stirring through this to prevent burning.
Stir in your stock slowly about a third at a time, keep on stirring to ensure smooth gravy.
Once your gravy is done, place the croquettes back into the gravy to heat through, making sure to coat all the pieces well- this can be done on the stovetop over low, covered.. Or in the oven at 350 for 30 minutes or so, covered. I opted for the oven since I use a huge pan and it frees up "topside" space to finish off dinner.
*If you like, you can add a couple sliced carrots at the time you are sauteing the onion. If you hate mushrooms, you can use beef stock instead, being sure to add the Worcestershire.
WTF is a croquette? Same thing as a burger, but in the shape of a log instead of round. A mini steak kind of shape with two flat sides to sear up quickly and set aside for it's final cooking in the gravy.
Felt the strange need to bake today too- guess the snow kind of brings it out, lol. Got to thinking about cookies. Now, we aren't big sweet eaters here, so a full batch of cookies is a bit much. Got to thinking of when I used to do mini-cookies for bistro. I would double batches and quarter them up, stashing the quarters in the freezer. Then I could do a shitton of a couple varieties.
Did I really want to go through that much trouble? Sure! Made a half batch each of peanut butter and nutella, split each of those in half (one for freezer one for today), and baked up two small batches of mini cookies, perfect to eat in a day or two. To make nutella cookies, I just used the PB recipe and used nutella instead. A quarter batch fills 2 cookie sheets with little cookies.


So I go to start getting stuff together to make cookies- shit, I have no brown sugar. Well, I do have white sugar and molasses, and that's all brown sugar is. So I made brown sugar.
2 1/2 cups sugar
2 ounces molasses
I started out following a description for dark brown sugar of 8:2 oz, and was unhappy. Added another cup to approximate the 8:1.5 oz, nope. Another 4 ounces of sugar and I was satisfied with a good dark brown sugar. So, 10:1 ratio for dark brown sugar.
Got in the 2014 Pinetree Seed catalog today, yay!!!! Kind of makes me extra glad I finally put in my 2013 wishlist order :) Hmmm, could I possibly be a good enough kid not to peek at it till Christmas and put it into the seed stocking? Probably not, lol. But it would make a cool addition to it.
It's pretty nice out today on the 13th- lots of sun, which makes me feel a tiny bit better about the season, lol.
Decided to do something with the luffas. There's lots of info about let them dry, but not much info on what to do if they couldn't go dry on the vine- as in, I live where it snows. Since they already got the freeze so it's too late to pull them before freezing, I decided to experiment and see if I could salvage any of these things.
So, first two luffas I peeled, sliced, and laid out on heavy paper to start to dry.
Second two got their skins pierced quite a bit, and laid on heavy paper to start to dry
Luffa 5 got peeled, sliced, and put into the dehydrator at 115
Luffa 6 got sliced up unpeeled, put on heavy paper, and into the oven at 200
Still have 2 more that I haven't touched yet
And at least another dozen on the vine still since some advice said just leave them there to winter dry
We shall see if any of these methods work, or if none of them do. Just a couple hours later and I'm already more hopeful about the dehydrator and oven unsurprisingly enough. I really would like to get at least a little bit of luffa, though I realize none of the fruits are mature enough to produce viable seed. Good thing I still have more seed. Makes me wonder if there is a short season luffa, lol. I will likely not grow them again next year or two- I'd rather use the space for beans and other squash. Eventually there will be a chicken house on that slab, but I will likely keep doing some vertical growing on that side even after that.
Sunday, November 10, 2013
Haven't done a post recently...
There really hasn't been much to post recently. Fall has come on with a rush here, full of wet and chilly weather and all the leaves coming off the trees.
So what have I been doing?
Brought all the tomatoes in and set them up in a couple trays in the kitchen to ripen, and they have been. Brought in a lot of the pots and containers to the solarium for overwintering and attempting to extend some harvest. Picking radishes.
Lots of cooking, tons of cooking experimenting. So, pulled together from a few drafts worth of notes, here it all is for future reference. They all still need some work though, lol.
First was a fall veggie roast.
1 can tomato paste
1/2 c white wine
1 large shallot, diced
1 cup water
1/4 c dried parsley
1 t each salt and white pepper
5-6 cloves, sliced
Mix all this together in the bottom of a 9x9 dish
6 golden beets, scrubbed and finely segmented
2 rutabega, scrubbed finely segmented
Spread a layer of beets, then rutabaga, then beets, then rutabaga- all the layers should be partially submerged
Cover and bake at 400 for 20 minutes
Meanwhile..
8 tiny eggplants- each one cut into 1/3ds, plankwise
1/2 pint grape or small cherry tomatoes, halved
5-6 small or 1-2 big NON green peppers, cut into slices
Layers these onto the root veggies, cover and turn the oven down to 300 and bake for another 30 minutes... Or till all the veggies are tender.
I used this to dress a big chunky pasta with, as a general side for a meat and potatoes kind of dinner, and as a leftover veggie chopped up and made into a skillet :)
Chucks White Chili- he gave me a wonderful version with how he always doubles the original.. I kind of went with what I had.. So here's how I made that
1T olive oil
3 lb chicken breasts, diced- do this while the chicken is half frozen, and makes for easier cubing.
1 medium onion, finely chopped
6 cloves garlic, minced- using big cloves
3 cans great northern beans, rinsed and drained
2 cups chicken stock from the freezer
3- 4 oz cans green chili peppers, undrained
1/2 cup dried yellow banana peppers, crumbled
3 dried serrano peppers, crumbled
1 cup water- to rehydrate peppers
2 T garlic powder
1 T cumin
1/2 t each cayenne, black, and chili dust peppers
1 T salt
16 oz sour cream
8 oz cream- and yes, real cream is required here
2 cans garbanzo beans, rinsed and drained
This is a two stage chili. It starts out on the stove, goes into the fridge overnight, and into the crockpot the next day for finishing.
Heat the 1 cup of water in a 4 cup bowl or measure. Add the dried yellow banana and serrano peppers to get them started hydrating. Add in the 3 cans of undrained chilis to this mash and set aside till needed.
Heat the olive oil in the bottom of a large dutch oven and brown up the chicken with the onions and fresh garlic. This should go almost au sec before proceeding.
Add the great northern beans, stock, rehydrated/canned pepper mash, and seasonings
Bring to a boil, reduce heat, and summer uncovered for 1 hour, stirring occasionally.
Remove from heat, and use a potato masher to mash up the mix a bit, paying particular attention to the beans.
Cool quickly, and pop it into the fridge overnight.
The next day, pull out your chili and let rest on the counter for an hour or so before you start heating. Start taking a spoon during this time to help break up the bits.
Then pop it into the crockpot- on high for two hours, though you can stretch it by an hour or two if neded by turning it down to low at this time.
About an hour before serving, turn the temp back to high if you turned it down.
Add the sour cream, cream, and garbanzo beans, and keep it on high for half an hour- make sure you don't let it boil.
Serve up.
Squash fritters
3 squashes- for this batch I used a medium each of carnival acorn, delicata, and kabocha squashes.
2 T butter, divided into 6ths
1 t each salt and pepper
1T or 6-8 leaves crumbled of dried sage
2 t turmeric
Halve, cleanout, and set up squashes in a pan with sides for baking
Fill the pan about half full of water
Sprinkle the salt, pepper, sage, and turmeric into the 6 cavities, and drop 1 piece of butter into each cavity.
Cover well, and bake at 300 degrees for 2 hours
Kill the heat and let squash rest in cooling oven for another hour
Pull out squash, uncover, and let cool to room temp before putting into fridge overnight- with shells on. You do this cavity side up to allow the seasonings time to sink back into the flesh
In the morning, scoop out this pulp and then use it to make yummy stuff, like fritters.
I took this overall recipe, and then divided the result into three bowls to try out three ways of doing this..
The main recipe:
All of the squash pulp
3 eggs
1 cup flour
3/4 cup cornmeal
1 T baking powder
I stirred the pulps of the squashes till smooth/chunky instead of mashing to a smoother pulp. Stirred in all the rest of the ingredients and poured into 3 bowls.
bowl 1 got about a half cup of dried herbs, mostly dill and parsley
bowl 2 got 1/4 curry sauce, 1 oz tahini
bowl 3 got a few shakes of hot sauce, 1/4 t hot flake, 2 t each paprika and garlic 1 t worst..
Bowls 1 and 3 did well in making fritters. I layed out breadcrumbs for 3 and it was a pointless mess. Just draining onto paper bags was good. Heat up about a half inch or so of oil and fry up.
Bowl 2 just fell apart- the extra liquid from the curry sauce really made a difference! So I decided to dump the whole bowl into the pan, let it fry up as best as possible- and used the bottom of a paper bag as sort of a bowl with a couple layers of bag under the bowl. Dumped the whole mess in and let it sit in a 200 degree oven for about an hour. Then I dumped on a ton of cracker crumbs, carefully folded down the "bowl" and flipped the whole mass and let soak out some more. The result was a surprisingly firm cake.
None of my seasoning additions made a huge impact to the overall squash taste though. They all taste good- squashy. But nothing to dance about.
Spicy beans and rice soup
1 lb ham
3 c dried kale
1 box beans and rice
1 c instant rice
8 cups water
1 T dried minced garlic, and 1 t pepper powders to the water
Bring ham, kale, and water up to a boil, covered. Reduce heat and hard simmer for about 30 minutes
Stir in beans and rice, cover, and drop down to a low simmer for about 30 minutes
Taste, and see if you need to add any spicy- hot sauce, ground peppers and salt if needed
Add instant rice, cover, and keep on low simmer for 10 minutes
Kill heat, uncover, and let sit for 10-15 minutes before serving
Upside down leftover meat casserole
2 leftover porkchops and mushroom gravy- you can use whatever meat of a couple portions- you will need at least a cup and a half of gravy, so make more if you need to. I ended up needing more, so made a quick dried mushroom and beef gravy with cornstarch
a couple portions of tail end veggies- I used broccoli this time from the freezer
tatertots- about a couple servings
So.. Toast up the tater tots in the oven as per package directions
reset oven for 350
put your tater tots on the bottom of the dish
Cover with your leftover veggies- since I used unseasoned broccoli, I dotted it with about a tablespoon of butter.
Cover that with your meat and gravy stuff
Cover the dish, and bake for about 45 minutes or so
Cabbage, bacon, and noodle casserole
1 package bacon- I used 12 oz, but recipes vary from 8-16 oz
1 large onion, cut on the radial thinly
4-8 cloves garlic, sliced
1 head cabbage
1 cup water
thyme, parsley, caraway, pepper...
8 oz package egg noodles
Cut bacon in half and fry up crisp, lay aside
Don't drain off your fat, use all of it!
Add in onion and garlic, saute a couple minutes
Add in cabbage, saute a couple minutes
Add in water and seasonings, cover, and simmer for 20 min or so till cabbage is tender
Add in cooked egg noodles, bacon, stir together, and serve
Note about seasonings here. Thyme and parsley are wonderful. Be careful of caraway- if you don't like it, yes, it's still necessary and you should add it. Pepper and salt are per taste at the end of the dish. I ended up adding in about 1/4 cup parsley, 1 T dill, 1t caraway, 2 T salt and 1/2 T pepper. I did all of the seasoning on the cabbage/onion mix, and made it potent on purpouse to offset the egg noodles and bacon.
Made a cheesy Halloween bake :)
1 package bacon- you can omit entirely since you use butter later on, and use up to 1 cups of other shredded/cubed leftover meat. Or use 1 can of beans.
1 head cauliflower
1 cup dried from frozen peas- NOT dried soup peas
1 medium onion, diced
1 cup celery, thinly sliced
3 T butter
3 T flour
2 T parsley
1 T dill
1/2-1 1/2 cup dairy- I used a combination of a leftover bottle of non-sweetened creamer and a bit of milk. Needed to use the creamer up.
bunch of velveeta 1-2 cups depending on your cheesiness level- or use other super melty cheeses.
Take a 2 cup measure, put peas in it, fill with water, and heat- let sit to rehydrate
Coarsely chunk up the cauliflower into a dozen or so chunks, and put into a deep pan with enough water to cover the bottom of the pan by a half inch or so. Tightly cover the pan and bake at 350 for 25-35 minutes depending on the size of the cauliflower chunks. Pull from the oven and let rest covered for 10-15 minutes. Then uncover, pull out of the pan and chunk it down into more bite or two pieces.
Bake the bacon in a single layer on parchment paper on a lipped cookie sheet 25-35 minutes, till chewy crisp. Baking is the better method for this dish. When done, put onto towels to drain. Once cool, roughly chop. And don't forget to pour off your bacon grease while still hot into it's crock- baking bacon makes for a very clean pour.
Saute the onion and celery with 1/3 of bacon in the butter till tender.
Add flour and mix well to coat everything
Add the liquid the peas have been rehydrating in for the first amount of liquid.
Add in half cup dairy and stir well
Start adding in your cheese. When about half of it's melted in, adjust thickness of the sauce with another 1/2 c dairy if needed.
Add second 1/3 of the bacon
Melt in the other half of your cheese. Adjust thickness with the last 1/2 c dairy if needed.
Stir in the peas and last 1/3 bacon
Gently fold in the cauliflower
Bake uncovered at 350 for about a half hour- till the stuff bubbles and gets a bit of color on top.
Also baked up a banana-pumpkin loaf. As usual, we have a couple of bananas that were softening too fast, so I figured as long as I had the oven on already, why not?
You can replace up to a quarter of flour called for in a recipe with pumpkin flour- or in this case, pumpkin and squash powder that I made myself.
Half a stick butter, melted
2 eggs
3 soft bananas
2/3 c sugar- I would reduce this to 1/2-1/3 cup next time. I think the sweetness of the pumpkin flour was such that the sugar could stand cutting back on.
1 c AP flour
1/3 c pumpkin flour
1/2 t baking soda
1/2 t salt
1/4 t baking powder
1/4 t cinnamon
1/8 t cloves
several grinds of the nutmeg grinder- 1/4 t or so?
Grease a loaf pan and set your oven to 350. I like to use a smidge of butter flavored crisco for this.
Mash the first 4 ingredients together- USE A PASTRY CUTTER! Way the hell easier than any other tool to use for this. Leaves you with a nice smooth mash with a little bit of small banana chunk in it. Pastry cutters are also the best tool to make a smooth and chunky guac :)
Add the rest of the ingredients and stir well- this will make a slightly stiff batter
Pour into prepared loaf pan
Bake for about 40 minutes at 350
Allow to cool a bit before unpanning upside down- you want the surface of the bread to already be well cooled enough to avoid collapsing of either top or bottom, but the loaf to still be a bit warm.
Decided to make mom's kluski noodle casserole for dinner tonight. Cept I'm using egg noodles instead of kluski noodles since I'm not fond of kluskis and also happened to have egg noodles.
1 pound ground beef- I used savory roll sausage instead
1 medium onion, chopped
2 cans cream of mushroom soup
1 pound frozen or 1 big can drained of corn
8 oz mushrooms undrained- which I didn't have so 1/3 cup dried mushrooms + 2/3 cup hot water to rehydrate
1/2 c dried shredded from fresh zucchini. My own addition, moms casserole never had this
2 cups noodles, cooked
Brown up yer meat, mix with everything else, and bake up at 350 for a half hour or so, till bubbly hot.
Turned out dead spot on with the yummy comforting casserole mom used to make.
Decided to make some stuffed squash for dinner :)
Halve and clean your squashes- set aside the seeds for roasting :) For stuffed squash, I use 4 mini springform pan rings set into my lasagna pan- throughout cooking you just need to handle the rings then, and the squash stay upright better. Put a bit of water in the pan, cover tightly, and bake at 400 for about 35 minutes. Pull from the oven, uncover, drain the water out of the bottom of the pan, and set aside so they cool a bit.
While this is going on, make your fillings. I decided on a bean and kale, and a spicy quinoa, mushroom, and corn.
Kale and white bean- this calls for using fresh hardy greens, but since I didn't have any on hand, I used dried and cooked it back to hydrated. You have to cook the kale back to hydration rather than soaking because it removes the bitters better.
3-4 handfuls of kale- fresh or rehydrated
1 can white beans, drained- I used great northerns
2-3 cloves garlic, thinly sliced
couple tablespoons olive oil
4-8 fresh sage leaves, about a tablespoon
2 T each breadcrumbs and Parmesan, mixed
Fill a pot with your kale and cover well with water- simmer 15 minutes, then drain well
Into the pot goes the olive oil and garlic. Saute for a minute or two till fragrant.
Into the pot goes the greens- stir well and saute for 2-3 minutes.
Into the pot goes the beans- stir well and let burple 2-3 minutes.
Add the sage along with salt and pepper to taste, kill heat, and cover- let sit till stuffing time.
Spicy quinoa, mushroom and corn filling- the quinoa I used follows a 1:2 ratio of quinoa to water.
1/2 c quinoa + 1 c water
1/3 c dried oven roasted corn
1/3 c dried mushrooms
1 c hot water to rehydrate the corn and mushrooms
1 t chili powder
1/2 t cumin
1/4 t hot pepper powder
1/4 t salt- depending on salt taste. I used it on this batch and I found the first taste of the quinoa before stirring in the mushrooms and corn too salty. By the time it was cool enough to stir in the cheese, the salt seemed right.
1 package Golden G Washingtons
2-3 cup shredded cheese, divided
Put corn, mushrooms, and hot water into a bowl and set aside to rehydrate
Follow packagage directions for making quinoa- add the Golden G Washingtons to this water
Once quinoa is done, stir in the chili powder, cumin, and hot pepper powder
Drain the mushrooms and corn well and stir into the quinoa- let sit till stuffing time. When it's stuffing time, stir 1/2c of the cheese into the stuffing, reserving the rest to sprinkle on top.
When it's stuffing time.. Stuff your squashes, duh. Top the beans and kale with the breadcrumbs and Parmesan cheese, top the spicy quinoa with the rest of the shredded cheese.
Bake at 400 degrees for 15-25 minutes, uncovered.
I shared around the stuffings in the squashes so we could get a wider range of tastes. We agreed that the quinoa stuffing was way yummier in the buttercup, and the bean was better in the sweet dumpling
I'm pretty positive if you wanted to and chilled everything down right, you could stuff your squashes, store them overnight, then pull them out, top them, and bake them off. Not sure if freezing would be good or not, that will have to be a future experiment.
Potato soup- my soups are rarely the same twice, hehe.
8 cups of stock
3 pounds potatoes- peeled and very rough chop
1/2 cup dried carrots- rehydrated 15 minutes and drained well
1 cup diced celery
1 medium onion, diced
1 large shallot, diced
1 head garlic, peeled and sliced thick
2 cans white beans, rinsed and drained
2 T bacon grease- yeah, that stuff you should be saving when you make bacon
2T parsley
2 T tarragon
2 T lemon verbena
1 T thyme
1 cup sour cream
In a large stockpot, heat bacon grease and saute the carrot, celery, onion, shallot, and garlic.
Once a fond starts to appear, and the veggies are really releasing steam, deglaze the pan with some of the stock.
Pour in the rest of the stock, add the beans and herbs, cover, and bring up to a boil, uncovered. Once at the boil, reduce heat to medium-med low, cover, and let simmer 15 minutes.
Pour in the potatoes, cover again, and let simmer for 45 minutes or so, till the potatoes are fall apart tender.
Stir the snot out of the soup with a potato masher to break up the chunks if you like your soup chunkier, or run it through a blender if you like it smoother.
Put in the sour cream and stir well to blend. Kill heat, and serve.
With the stuffing of the squash gone well the other day, and having a bunch of tomatoes handy... hmmm, how about stuffed tomatoes for dinner? I had thought about making a wee batch of yellow spaghetti sauce to go over the spaghetti squash, but decided to stuff instead- more experimentation for me :) I picked out 6 tomatoes, and am doing 3 stuffings.
Quinoa and spinach:
1/4 c quinoa+ 1/2 c water. Cooked according to package directions.
1 c frozen spinach, defrosted
1 T fresh parsley
1/2 T fresh rosemary
2-3 garlic cloves, coarse dice
1-2 T olive oil
1 t dried minced garlic
Bring oil up to heat, briefly saute the fresh garlic, add the spinach and saute 3-4 minutes. Kill the heat, stir in the parsley, rosemary, and dried garlic. When quinoa is done, stir into spinach. Season to taste, and set aside till stuffing. Makes about 1 1/2 cups.
Tomato and rice:
1/4 c brown rice
2 cloves garlic, thinly sliced
1 large shallot, minced
1 T olive oil
1 T basil
1/2 T marjoram
2 T dried mushrooms, crushed
tomato puree- when you core your tomatoes, reserve the guts and whir them up in the blender or food processor.
Sweat the shallot and garlic
Add rice, and toast 3 minutes or so
Stir in 1/4 cup of puree to moisten
Stir in basil, marjoram, and mushrooms
Stir in another 1/4 c of puree
Allow to sizzle away for about a miniute or two, stirring the whole time
Stir in another 1/4 of puree, cover, and drop the heat down to low. Let cook for 15 minutes, occasionally stirring and adding in more puree if needed, ended up using 3/4 cup.
Tuna and cheese:
1 can tuna
1/2 block cream cheese
1/4 cup bread crumbs
2 T butter
1/2 T dill
1/2 T old bay seasoning
When it's time for dinner, stuff your tomatoes, and bake off at 350 for 20 minutes or so.
Realized after dinner some things.. The quinoa was best. The rice should have been at least par cooked before the puree, didn't cook up tender correctly. And the tuna should have used less bread crumbs, better flavoring- and in general needs a serious overhaul before I try that one again. But they were are pretty good anyway.
 Nova is sitting there wondering WTF that is on the other side of the stove.
So what have I been doing?
Brought all the tomatoes in and set them up in a couple trays in the kitchen to ripen, and they have been. Brought in a lot of the pots and containers to the solarium for overwintering and attempting to extend some harvest. Picking radishes.
Lots of cooking, tons of cooking experimenting. So, pulled together from a few drafts worth of notes, here it all is for future reference. They all still need some work though, lol.
First was a fall veggie roast.
1 can tomato paste
1/2 c white wine
1 large shallot, diced
1 cup water
1/4 c dried parsley
1 t each salt and white pepper
5-6 cloves, sliced
Mix all this together in the bottom of a 9x9 dish
6 golden beets, scrubbed and finely segmented
2 rutabega, scrubbed finely segmented
Spread a layer of beets, then rutabaga, then beets, then rutabaga- all the layers should be partially submerged
Cover and bake at 400 for 20 minutes
Meanwhile..
8 tiny eggplants- each one cut into 1/3ds, plankwise
1/2 pint grape or small cherry tomatoes, halved
5-6 small or 1-2 big NON green peppers, cut into slices
Layers these onto the root veggies, cover and turn the oven down to 300 and bake for another 30 minutes... Or till all the veggies are tender.
I used this to dress a big chunky pasta with, as a general side for a meat and potatoes kind of dinner, and as a leftover veggie chopped up and made into a skillet :)
Chucks White Chili- he gave me a wonderful version with how he always doubles the original.. I kind of went with what I had.. So here's how I made that
1T olive oil
3 lb chicken breasts, diced- do this while the chicken is half frozen, and makes for easier cubing.
1 medium onion, finely chopped
6 cloves garlic, minced- using big cloves
3 cans great northern beans, rinsed and drained
2 cups chicken stock from the freezer
3- 4 oz cans green chili peppers, undrained
1/2 cup dried yellow banana peppers, crumbled
3 dried serrano peppers, crumbled
1 cup water- to rehydrate peppers
2 T garlic powder
1 T cumin
1/2 t each cayenne, black, and chili dust peppers
1 T salt
16 oz sour cream
8 oz cream- and yes, real cream is required here
2 cans garbanzo beans, rinsed and drained
This is a two stage chili. It starts out on the stove, goes into the fridge overnight, and into the crockpot the next day for finishing.
Heat the 1 cup of water in a 4 cup bowl or measure. Add the dried yellow banana and serrano peppers to get them started hydrating. Add in the 3 cans of undrained chilis to this mash and set aside till needed.
Heat the olive oil in the bottom of a large dutch oven and brown up the chicken with the onions and fresh garlic. This should go almost au sec before proceeding.
Add the great northern beans, stock, rehydrated/canned pepper mash, and seasonings
Bring to a boil, reduce heat, and summer uncovered for 1 hour, stirring occasionally.
Remove from heat, and use a potato masher to mash up the mix a bit, paying particular attention to the beans.
Cool quickly, and pop it into the fridge overnight.
The next day, pull out your chili and let rest on the counter for an hour or so before you start heating. Start taking a spoon during this time to help break up the bits.
Then pop it into the crockpot- on high for two hours, though you can stretch it by an hour or two if neded by turning it down to low at this time.
About an hour before serving, turn the temp back to high if you turned it down.
Add the sour cream, cream, and garbanzo beans, and keep it on high for half an hour- make sure you don't let it boil.
Serve up.
Squash fritters
3 squashes- for this batch I used a medium each of carnival acorn, delicata, and kabocha squashes.
2 T butter, divided into 6ths
1 t each salt and pepper
1T or 6-8 leaves crumbled of dried sage
2 t turmeric
Halve, cleanout, and set up squashes in a pan with sides for baking
Fill the pan about half full of water
Sprinkle the salt, pepper, sage, and turmeric into the 6 cavities, and drop 1 piece of butter into each cavity.
Cover well, and bake at 300 degrees for 2 hours
Kill the heat and let squash rest in cooling oven for another hour
Pull out squash, uncover, and let cool to room temp before putting into fridge overnight- with shells on. You do this cavity side up to allow the seasonings time to sink back into the flesh
In the morning, scoop out this pulp and then use it to make yummy stuff, like fritters.
I took this overall recipe, and then divided the result into three bowls to try out three ways of doing this..
The main recipe:
All of the squash pulp
3 eggs
1 cup flour
3/4 cup cornmeal
1 T baking powder
I stirred the pulps of the squashes till smooth/chunky instead of mashing to a smoother pulp. Stirred in all the rest of the ingredients and poured into 3 bowls.
bowl 1 got about a half cup of dried herbs, mostly dill and parsley
bowl 2 got 1/4 curry sauce, 1 oz tahini
bowl 3 got a few shakes of hot sauce, 1/4 t hot flake, 2 t each paprika and garlic 1 t worst..
Bowls 1 and 3 did well in making fritters. I layed out breadcrumbs for 3 and it was a pointless mess. Just draining onto paper bags was good. Heat up about a half inch or so of oil and fry up.
Bowl 2 just fell apart- the extra liquid from the curry sauce really made a difference! So I decided to dump the whole bowl into the pan, let it fry up as best as possible- and used the bottom of a paper bag as sort of a bowl with a couple layers of bag under the bowl. Dumped the whole mess in and let it sit in a 200 degree oven for about an hour. Then I dumped on a ton of cracker crumbs, carefully folded down the "bowl" and flipped the whole mass and let soak out some more. The result was a surprisingly firm cake.
None of my seasoning additions made a huge impact to the overall squash taste though. They all taste good- squashy. But nothing to dance about.
Spicy beans and rice soup
1 lb ham
3 c dried kale
1 box beans and rice
1 c instant rice
8 cups water
1 T dried minced garlic, and 1 t pepper powders to the water
Bring ham, kale, and water up to a boil, covered. Reduce heat and hard simmer for about 30 minutes
Stir in beans and rice, cover, and drop down to a low simmer for about 30 minutes
Taste, and see if you need to add any spicy- hot sauce, ground peppers and salt if needed
Add instant rice, cover, and keep on low simmer for 10 minutes
Kill heat, uncover, and let sit for 10-15 minutes before serving
Upside down leftover meat casserole
2 leftover porkchops and mushroom gravy- you can use whatever meat of a couple portions- you will need at least a cup and a half of gravy, so make more if you need to. I ended up needing more, so made a quick dried mushroom and beef gravy with cornstarch
a couple portions of tail end veggies- I used broccoli this time from the freezer
tatertots- about a couple servings
So.. Toast up the tater tots in the oven as per package directions
reset oven for 350
put your tater tots on the bottom of the dish
Cover with your leftover veggies- since I used unseasoned broccoli, I dotted it with about a tablespoon of butter.
Cover that with your meat and gravy stuff
Cover the dish, and bake for about 45 minutes or so
Cabbage, bacon, and noodle casserole
1 package bacon- I used 12 oz, but recipes vary from 8-16 oz
1 large onion, cut on the radial thinly
4-8 cloves garlic, sliced
1 head cabbage
1 cup water
thyme, parsley, caraway, pepper...
8 oz package egg noodles
Cut bacon in half and fry up crisp, lay aside
Don't drain off your fat, use all of it!
Add in onion and garlic, saute a couple minutes
Add in cabbage, saute a couple minutes
Add in water and seasonings, cover, and simmer for 20 min or so till cabbage is tender
Add in cooked egg noodles, bacon, stir together, and serve
Note about seasonings here. Thyme and parsley are wonderful. Be careful of caraway- if you don't like it, yes, it's still necessary and you should add it. Pepper and salt are per taste at the end of the dish. I ended up adding in about 1/4 cup parsley, 1 T dill, 1t caraway, 2 T salt and 1/2 T pepper. I did all of the seasoning on the cabbage/onion mix, and made it potent on purpouse to offset the egg noodles and bacon.
Made a cheesy Halloween bake :)
1 package bacon- you can omit entirely since you use butter later on, and use up to 1 cups of other shredded/cubed leftover meat. Or use 1 can of beans.
1 head cauliflower
1 cup dried from frozen peas- NOT dried soup peas
1 medium onion, diced
1 cup celery, thinly sliced
3 T butter
3 T flour
2 T parsley
1 T dill
1/2-1 1/2 cup dairy- I used a combination of a leftover bottle of non-sweetened creamer and a bit of milk. Needed to use the creamer up.
bunch of velveeta 1-2 cups depending on your cheesiness level- or use other super melty cheeses.
Take a 2 cup measure, put peas in it, fill with water, and heat- let sit to rehydrate
Coarsely chunk up the cauliflower into a dozen or so chunks, and put into a deep pan with enough water to cover the bottom of the pan by a half inch or so. Tightly cover the pan and bake at 350 for 25-35 minutes depending on the size of the cauliflower chunks. Pull from the oven and let rest covered for 10-15 minutes. Then uncover, pull out of the pan and chunk it down into more bite or two pieces.
Bake the bacon in a single layer on parchment paper on a lipped cookie sheet 25-35 minutes, till chewy crisp. Baking is the better method for this dish. When done, put onto towels to drain. Once cool, roughly chop. And don't forget to pour off your bacon grease while still hot into it's crock- baking bacon makes for a very clean pour.
Saute the onion and celery with 1/3 of bacon in the butter till tender.
Add flour and mix well to coat everything
Add the liquid the peas have been rehydrating in for the first amount of liquid.
Add in half cup dairy and stir well
Start adding in your cheese. When about half of it's melted in, adjust thickness of the sauce with another 1/2 c dairy if needed.
Add second 1/3 of the bacon
Melt in the other half of your cheese. Adjust thickness with the last 1/2 c dairy if needed.
Stir in the peas and last 1/3 bacon
Gently fold in the cauliflower
Bake uncovered at 350 for about a half hour- till the stuff bubbles and gets a bit of color on top.
Also baked up a banana-pumpkin loaf. As usual, we have a couple of bananas that were softening too fast, so I figured as long as I had the oven on already, why not?
You can replace up to a quarter of flour called for in a recipe with pumpkin flour- or in this case, pumpkin and squash powder that I made myself.
Half a stick butter, melted
2 eggs
3 soft bananas
2/3 c sugar- I would reduce this to 1/2-1/3 cup next time. I think the sweetness of the pumpkin flour was such that the sugar could stand cutting back on.
1 c AP flour
1/3 c pumpkin flour
1/2 t baking soda
1/2 t salt
1/4 t baking powder
1/4 t cinnamon
1/8 t cloves
several grinds of the nutmeg grinder- 1/4 t or so?
Grease a loaf pan and set your oven to 350. I like to use a smidge of butter flavored crisco for this.
Mash the first 4 ingredients together- USE A PASTRY CUTTER! Way the hell easier than any other tool to use for this. Leaves you with a nice smooth mash with a little bit of small banana chunk in it. Pastry cutters are also the best tool to make a smooth and chunky guac :)
Add the rest of the ingredients and stir well- this will make a slightly stiff batter
Pour into prepared loaf pan
Bake for about 40 minutes at 350
Allow to cool a bit before unpanning upside down- you want the surface of the bread to already be well cooled enough to avoid collapsing of either top or bottom, but the loaf to still be a bit warm.
Decided to make mom's kluski noodle casserole for dinner tonight. Cept I'm using egg noodles instead of kluski noodles since I'm not fond of kluskis and also happened to have egg noodles.
1 pound ground beef- I used savory roll sausage instead
1 medium onion, chopped
2 cans cream of mushroom soup
1 pound frozen or 1 big can drained of corn
8 oz mushrooms undrained- which I didn't have so 1/3 cup dried mushrooms + 2/3 cup hot water to rehydrate
1/2 c dried shredded from fresh zucchini. My own addition, moms casserole never had this
2 cups noodles, cooked
Brown up yer meat, mix with everything else, and bake up at 350 for a half hour or so, till bubbly hot.
Turned out dead spot on with the yummy comforting casserole mom used to make.
Decided to make some stuffed squash for dinner :)
Halve and clean your squashes- set aside the seeds for roasting :) For stuffed squash, I use 4 mini springform pan rings set into my lasagna pan- throughout cooking you just need to handle the rings then, and the squash stay upright better. Put a bit of water in the pan, cover tightly, and bake at 400 for about 35 minutes. Pull from the oven, uncover, drain the water out of the bottom of the pan, and set aside so they cool a bit.
While this is going on, make your fillings. I decided on a bean and kale, and a spicy quinoa, mushroom, and corn.
Kale and white bean- this calls for using fresh hardy greens, but since I didn't have any on hand, I used dried and cooked it back to hydrated. You have to cook the kale back to hydration rather than soaking because it removes the bitters better.
3-4 handfuls of kale- fresh or rehydrated
1 can white beans, drained- I used great northerns
2-3 cloves garlic, thinly sliced
couple tablespoons olive oil
4-8 fresh sage leaves, about a tablespoon
2 T each breadcrumbs and Parmesan, mixed
Fill a pot with your kale and cover well with water- simmer 15 minutes, then drain well
Into the pot goes the olive oil and garlic. Saute for a minute or two till fragrant.
Into the pot goes the greens- stir well and saute for 2-3 minutes.
Into the pot goes the beans- stir well and let burple 2-3 minutes.
Add the sage along with salt and pepper to taste, kill heat, and cover- let sit till stuffing time.
Spicy quinoa, mushroom and corn filling- the quinoa I used follows a 1:2 ratio of quinoa to water.
1/2 c quinoa + 1 c water
1/3 c dried oven roasted corn
1/3 c dried mushrooms
1 c hot water to rehydrate the corn and mushrooms
1 t chili powder
1/2 t cumin
1/4 t hot pepper powder
1/4 t salt- depending on salt taste. I used it on this batch and I found the first taste of the quinoa before stirring in the mushrooms and corn too salty. By the time it was cool enough to stir in the cheese, the salt seemed right.
1 package Golden G Washingtons
2-3 cup shredded cheese, divided
Put corn, mushrooms, and hot water into a bowl and set aside to rehydrate
Follow packagage directions for making quinoa- add the Golden G Washingtons to this water
Once quinoa is done, stir in the chili powder, cumin, and hot pepper powder
Drain the mushrooms and corn well and stir into the quinoa- let sit till stuffing time. When it's stuffing time, stir 1/2c of the cheese into the stuffing, reserving the rest to sprinkle on top.
When it's stuffing time.. Stuff your squashes, duh. Top the beans and kale with the breadcrumbs and Parmesan cheese, top the spicy quinoa with the rest of the shredded cheese.
Bake at 400 degrees for 15-25 minutes, uncovered.
I shared around the stuffings in the squashes so we could get a wider range of tastes. We agreed that the quinoa stuffing was way yummier in the buttercup, and the bean was better in the sweet dumpling
I'm pretty positive if you wanted to and chilled everything down right, you could stuff your squashes, store them overnight, then pull them out, top them, and bake them off. Not sure if freezing would be good or not, that will have to be a future experiment.
Potato soup- my soups are rarely the same twice, hehe.
8 cups of stock
3 pounds potatoes- peeled and very rough chop
1/2 cup dried carrots- rehydrated 15 minutes and drained well
1 cup diced celery
1 medium onion, diced
1 large shallot, diced
1 head garlic, peeled and sliced thick
2 cans white beans, rinsed and drained
2 T bacon grease- yeah, that stuff you should be saving when you make bacon
2T parsley
2 T tarragon
2 T lemon verbena
1 T thyme
1 cup sour cream
In a large stockpot, heat bacon grease and saute the carrot, celery, onion, shallot, and garlic.
Once a fond starts to appear, and the veggies are really releasing steam, deglaze the pan with some of the stock.
Pour in the rest of the stock, add the beans and herbs, cover, and bring up to a boil, uncovered. Once at the boil, reduce heat to medium-med low, cover, and let simmer 15 minutes.
Pour in the potatoes, cover again, and let simmer for 45 minutes or so, till the potatoes are fall apart tender.
Stir the snot out of the soup with a potato masher to break up the chunks if you like your soup chunkier, or run it through a blender if you like it smoother.
Put in the sour cream and stir well to blend. Kill heat, and serve.
With the stuffing of the squash gone well the other day, and having a bunch of tomatoes handy... hmmm, how about stuffed tomatoes for dinner? I had thought about making a wee batch of yellow spaghetti sauce to go over the spaghetti squash, but decided to stuff instead- more experimentation for me :) I picked out 6 tomatoes, and am doing 3 stuffings.
Quinoa and spinach:
1/4 c quinoa+ 1/2 c water. Cooked according to package directions.
1 c frozen spinach, defrosted
1 T fresh parsley
1/2 T fresh rosemary
2-3 garlic cloves, coarse dice
1-2 T olive oil
1 t dried minced garlic
Bring oil up to heat, briefly saute the fresh garlic, add the spinach and saute 3-4 minutes. Kill the heat, stir in the parsley, rosemary, and dried garlic. When quinoa is done, stir into spinach. Season to taste, and set aside till stuffing. Makes about 1 1/2 cups.
Tomato and rice:
1/4 c brown rice
2 cloves garlic, thinly sliced
1 large shallot, minced
1 T olive oil
1 T basil
1/2 T marjoram
2 T dried mushrooms, crushed
tomato puree- when you core your tomatoes, reserve the guts and whir them up in the blender or food processor.
Sweat the shallot and garlic
Add rice, and toast 3 minutes or so
Stir in 1/4 cup of puree to moisten
Stir in basil, marjoram, and mushrooms
Stir in another 1/4 c of puree
Allow to sizzle away for about a miniute or two, stirring the whole time
Stir in another 1/4 of puree, cover, and drop the heat down to low. Let cook for 15 minutes, occasionally stirring and adding in more puree if needed, ended up using 3/4 cup.
Tuna and cheese:
1 can tuna
1/2 block cream cheese
1/4 cup bread crumbs
2 T butter
1/2 T dill
1/2 T old bay seasoning
When it's time for dinner, stuff your tomatoes, and bake off at 350 for 20 minutes or so.
Realized after dinner some things.. The quinoa was best. The rice should have been at least par cooked before the puree, didn't cook up tender correctly. And the tuna should have used less bread crumbs, better flavoring- and in general needs a serious overhaul before I try that one again. But they were are pretty good anyway.

Wednesday, October 23, 2013
Harvesting tomato seed..
Time for a tutorial... This started on October 16th...
How to harvest tomato seed? It isn't the standard cut and dry method. It's a wet fermentation method...
 You need a couple tomatoes, a fermenting jar, a knife and cutting surface. Note the bigger tomato on the left- it has bruising.. the one on the right is an overripe but still good tomato.
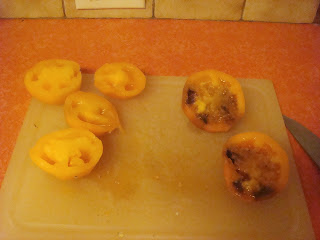 The larger and more bruised/damaged one shows it inside. You don't want any blackened icky portions of seed when you go to save. The halves on the left show what the insides should look like for saving.
 And here's a pic of the outsides of the same tomatoes.
 Your seed cavities should look fully healthy like this.
 Don't try to save any of this unless it's a really rare and you can't get more/better any time soon. Then I might say save some of the yellowest goo bits.

 This is how much water I added.
Now I capped the jar with a used lid and ring, set it on the counter to ferment..for a week. Make sure the cap isn't air tight- you want a little air to get in there to help with the fermentation.
So, here it is a week later... October 23.
 Took the cap off and here we have a fine scum on the top. This is a good thing.
 This is a side view, I sloshed a bit of the scum up onto the side of the glass, oops. Notice the light upper layer, and the darker bottom layer with the dots in it? Those dots are the seeds :)
 After carefully pulling the scum off the top as you can, pour the liquid into a strainer. This is the goo before starting to rinse.
 And here's the same mass after rinsing. Kind of rub the seeds against the mesh a bit to help any clinging goo to come off and go through the mesh away from the seed. It's ok if they aren't perfect clean, but you shouldn't have much goo there.
Drop your cleaned seed into a dish and tuck away in a warm, dry, and safe spot and let totally dry before packing up. You might want to stir the seeds a couple times while drying to make sure they all get separated.
How to harvest tomato seed? It isn't the standard cut and dry method. It's a wet fermentation method...


This is how much goo came out of the two tomatoes on the left into the jar.

Now I capped the jar with a used lid and ring, set it on the counter to ferment..for a week. Make sure the cap isn't air tight- you want a little air to get in there to help with the fermentation.
So, here it is a week later... October 23.


Drop your cleaned seed into a dish and tuck away in a warm, dry, and safe spot and let totally dry before packing up. You might want to stir the seeds a couple times while drying to make sure they all get separated.
Wednesday, October 16, 2013
Getting it done...
I've gotten a couple things done over the last few days...
Weeded out the root crop area of the herb garden. And yes, I gave up to temptation and pulled up 4 white icicle radishes- they were ready to be picked :) Nothing else was, and I was good and left the rest alone. I think after I pull all of them I need to put down a load of horse poo and leaves this year to overwinter.
I also got the daffodils planted in, yay! Took a goodly bit of time, but here's the result.
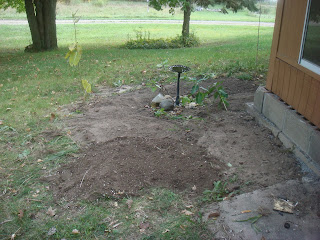 I know, the edge is still scrappy as hell- that will get more properly trimmed out in the spring when the next set of bulbs go in. I left in a couple of the milkweeds too. I planted small patches at a time. You can sort of see where I started out along the wall line and worked my way around the bird bath going counter clockwise. I'm kind of hoping this will look nice and fill in decently. I wanted to work around the birdbath since I knew that's where the drip point off the corner of the roof is. The line closest to me is approximately where I want the slab to edge up to eventually. Next step before winter will be sinking in a line of recycled cans to finish out that line.
This whole area took a while because I went through with a hand trowel and dug out a lot of root bits and a bit of gravel. I wasn't meticulous about getting the gravel out, but I did pick out all the bigger rocks. Those got dumped at the top of the hill where I want a patch of gravel.
I'm hoping to be able to pick up a couple bags of grape hyacinth on clearance soon like I did last year, and cut in blocks in the spring like I did last year.
Monday, Monday..
Got the seed trades packed and ready to go, along with other mail.. Even drove it to the post office- then discovered it was a holiday today, Columbus day. Oops. Decided while out an about to hit up the local stores for their Halloween wares. See what my local shops had compared to when I was out visiting. Glad I did because that stuff was already being clearanced out.
I now have three buildings. A candy shop and a B&B from JoAnns, and a blood bar from Michaels. Rather happy about the blood bar, I snagged it from the display to get it. I also picked up a handful of smalls. All in all, making a rather tight gathering on the mantel at the moment. I have to clean up Gluggs tank and install his heater before I can do final arranging.
I hit the local places that carry bulbs too- everyone is currently in full selling mode, no clearances yet on bulbs.
I've added a couple new links to the right...
http://listeningtoleaves.blogspot.com/2012/11/kintsugi-art-of-repairing-teaware.html a blog posting about Kintsugi, the art of repairing ceramic with precious metals. Very informative. It's under Making Stuff.
http://www.archaeoastronomy.com/myclock.html earth's position relative to seasonal cusps. As in what on todays date is the real times for the eight holidays. Brings up some fun points :)
Or wedding this year was truly on Beltane eve. True Beltane struck at three AM on the 5th, and we celebrated from Friday to Sunday :)
Halloween this year is actually on the light side of midnight on November 7th.
This link is under Cool Links.
Tuesday is gloomy. Stayed indoors and did some cleaning. Set up the Halloween stuff in the living room.
I needed to clean Gluggs tank and set up the heater for him first. I decided to move the whole tank to the other side of the mantel closer to the power supply in the corner. I hope he's happy where he's at now, and feeling a bit better about having warmer water. Apparently betas like warmer water in the upper 70's. And leaving the light on does not heat the water enough, promotes algae too much, and sort of messes with the betas normally preferred light and dark cycle.
So after that I was able to set up my new Halloween village.
 Starting on the outer corner is the big ghostie I made as a kid and the local candy shop. Chocolate eyeballs and poison apples are in stock right now :)
 Next to the candy shop is the local B&B. Grim is hanging out having his morning coffee and doughnuts while other folks go about their daily business.
 On through the pumpkin patch, where the Great Pumpkin reigns supreme.
 And into the graveyard, overseen by Job... He is being backlit by Gluggs tank :)
 And up the way on the first shelf is the local blood bar. All sorts of folks hang out here! There are many vintages on special today, and the ever running blood fountain for general refreshment.
I did have all the pieces on the mantle at first, and everything was just too squashed up. Gluggs tank seriously makes a footprint! Spreading it out to take up the first shelf makes it all look a tad sparse, but that's a good thing. I know I will end up collecting more- possibly more than I really have space for, lol.
 And this is the little witch that tells me how many days till Halloween, she resides on my filing cabinet. Off to her left is her little box of pumpkin numbers, and I can change the numbers daily :)
Decided to look around at what all there is in the world of Halloween village, and my goodness there is a lot of really neat stuff out there.. and a ton of stuff I'm kind of meh about. A couple that have particularly struck my fancy..


The Grinning Goblin Brewery by Lemax
There are tons of smalls that strike my fancy as well. And I've realized that just with the houses, pumpkin, and tombstone to light up that using all plug in cords will not do. I want to instead use battery operated lights, preferably led and maybe on a timer if I get really lucky. Huh, wonder if that sort of thing is within the realm of a raspberry pi- that would be a neat thing for folks that like to run holiday villages. Just hook up all the much smaller led leads, and have a Rpi programed to run the lights.
I also need to "give back" the second Halloween decor bin. Those three buildings come in some large boxes, and you bet I will be packing them away in those boxes. Right now the second bin is holding a full bin of shredded paper that needs to go out to trace in the garlic bed. I'm going to use the paper as sort of a base marker mulch that hopefully will show up nicely under a leaf layer. It just started raining, so I don't have to water in the bed before I start spreading paper :)
I want to grind up another batch of paper or two to lay down over the area at the top of the hill that leads down to the sanctuary. I've put in a lot of dug up gravel from the herb garden and around the solarium, and now I want a tamping in layer. I might also want to layer in a bag of beer caps. I want to firm pack in this spot before I terrace out any further. And allow the other side of the opening to firm up with mints- the chocolate mint is bordering this area, and doing well. After a large die off of moving the pineapple mint as I did, we have firm areas of this mint taking off too where it's supposed to. And several starts of leftovers from where I removed it that can now go into the die off areas.
This first terrace area is taking a while to firm up, but it's worth it.
Back to indoor stuff.. Started rearranging the library over the weekend past. Had a couple of menfolk on hand to shuffle bookcases. Set up the beta globe on the top of one, and it makes for wonderful lighting in the area. Need to fill it with water and some reflecting filler. Thinking through the rearranging, I want to set up the hermit crab tank in the library too. But as a tank for living stones this time.
Weeded out the root crop area of the herb garden. And yes, I gave up to temptation and pulled up 4 white icicle radishes- they were ready to be picked :) Nothing else was, and I was good and left the rest alone. I think after I pull all of them I need to put down a load of horse poo and leaves this year to overwinter.
I also got the daffodils planted in, yay! Took a goodly bit of time, but here's the result.

This whole area took a while because I went through with a hand trowel and dug out a lot of root bits and a bit of gravel. I wasn't meticulous about getting the gravel out, but I did pick out all the bigger rocks. Those got dumped at the top of the hill where I want a patch of gravel.
I'm hoping to be able to pick up a couple bags of grape hyacinth on clearance soon like I did last year, and cut in blocks in the spring like I did last year.
Monday, Monday..
Got the seed trades packed and ready to go, along with other mail.. Even drove it to the post office- then discovered it was a holiday today, Columbus day. Oops. Decided while out an about to hit up the local stores for their Halloween wares. See what my local shops had compared to when I was out visiting. Glad I did because that stuff was already being clearanced out.
I now have three buildings. A candy shop and a B&B from JoAnns, and a blood bar from Michaels. Rather happy about the blood bar, I snagged it from the display to get it. I also picked up a handful of smalls. All in all, making a rather tight gathering on the mantel at the moment. I have to clean up Gluggs tank and install his heater before I can do final arranging.
I hit the local places that carry bulbs too- everyone is currently in full selling mode, no clearances yet on bulbs.
I've added a couple new links to the right...
http://listeningtoleaves.blogspot.com/2012/11/kintsugi-art-of-repairing-teaware.html a blog posting about Kintsugi, the art of repairing ceramic with precious metals. Very informative. It's under Making Stuff.
http://www.archaeoastronomy.com/myclock.html earth's position relative to seasonal cusps. As in what on todays date is the real times for the eight holidays. Brings up some fun points :)
Or wedding this year was truly on Beltane eve. True Beltane struck at three AM on the 5th, and we celebrated from Friday to Sunday :)
Halloween this year is actually on the light side of midnight on November 7th.
This link is under Cool Links.
Tuesday is gloomy. Stayed indoors and did some cleaning. Set up the Halloween stuff in the living room.
I needed to clean Gluggs tank and set up the heater for him first. I decided to move the whole tank to the other side of the mantel closer to the power supply in the corner. I hope he's happy where he's at now, and feeling a bit better about having warmer water. Apparently betas like warmer water in the upper 70's. And leaving the light on does not heat the water enough, promotes algae too much, and sort of messes with the betas normally preferred light and dark cycle.
So after that I was able to set up my new Halloween village.


I did have all the pieces on the mantle at first, and everything was just too squashed up. Gluggs tank seriously makes a footprint! Spreading it out to take up the first shelf makes it all look a tad sparse, but that's a good thing. I know I will end up collecting more- possibly more than I really have space for, lol.

Decided to look around at what all there is in the world of Halloween village, and my goodness there is a lot of really neat stuff out there.. and a ton of stuff I'm kind of meh about. A couple that have particularly struck my fancy..

The Retching Pumpkin by Dept 56
The Grinning Goblin Brewery by Lemax
There are tons of smalls that strike my fancy as well. And I've realized that just with the houses, pumpkin, and tombstone to light up that using all plug in cords will not do. I want to instead use battery operated lights, preferably led and maybe on a timer if I get really lucky. Huh, wonder if that sort of thing is within the realm of a raspberry pi- that would be a neat thing for folks that like to run holiday villages. Just hook up all the much smaller led leads, and have a Rpi programed to run the lights.
I also need to "give back" the second Halloween decor bin. Those three buildings come in some large boxes, and you bet I will be packing them away in those boxes. Right now the second bin is holding a full bin of shredded paper that needs to go out to trace in the garlic bed. I'm going to use the paper as sort of a base marker mulch that hopefully will show up nicely under a leaf layer. It just started raining, so I don't have to water in the bed before I start spreading paper :)
I want to grind up another batch of paper or two to lay down over the area at the top of the hill that leads down to the sanctuary. I've put in a lot of dug up gravel from the herb garden and around the solarium, and now I want a tamping in layer. I might also want to layer in a bag of beer caps. I want to firm pack in this spot before I terrace out any further. And allow the other side of the opening to firm up with mints- the chocolate mint is bordering this area, and doing well. After a large die off of moving the pineapple mint as I did, we have firm areas of this mint taking off too where it's supposed to. And several starts of leftovers from where I removed it that can now go into the die off areas.
This first terrace area is taking a while to firm up, but it's worth it.
Back to indoor stuff.. Started rearranging the library over the weekend past. Had a couple of menfolk on hand to shuffle bookcases. Set up the beta globe on the top of one, and it makes for wonderful lighting in the area. Need to fill it with water and some reflecting filler. Thinking through the rearranging, I want to set up the hermit crab tank in the library too. But as a tank for living stones this time.
Saturday, October 12, 2013
Back at Growbox Hill
I got back home yesterday afternoon. I love visiting, but always love being home more :) It was a rather nice and boring kind of drive home- always a bonus when driving through Chicago :) So after getting home was pretty much hanging with my love and meows, unloading the car.. Just getting back home.
Today was some cleanup. Starting in on kitchen cleanup, mostly dishes. Unpacking from being gone- and that's always a thing, hehehe. Picked up the garlic and garden raid that I talked about in the last post. And a bunch of other stuff too.
A couple of sweaters and fall coat- all from Goodwill at damn fine prices. A goodly stack of books, ranging from 49 to 99 cents, most of them being on the low end. A couple odds and ends.
The books reminded me- I need to check in with the local library and see what I can drop off or not. I have a heap of books and such to donate, and I'd like to see them in the best donating sources.
And a fantastically cool board game- Gourmet Challenge. It's kind of a trivial pursuit, only in all things culinary. Origins of foods, eating etiquette, ingredients... And checking out the game of 2 boxed decks, a lot of stuff I know, a lot of stuff I don't. You have to build a cake of layers instead of filling in your pie. And the game was 100% complete- all for 6 bucks.
So, here's the catalog of what I got from my brothers yard.
 I picked some of the fluffy ariels from this plant. You can see a cluster that I left to the right, and the frilly leaves of the plant in the center.
 This is a purple spikes something- I gather seed heads from this one.
 Stripped a few heads off what I think is an allium of some sort. At least the seed heads looked just like the ones I stripped off the solarium allium. This variety has a much thinner stem and leaf set.
 Stripped seed heads from this daisy
 This is a Wisconsin native of some sort, has large daisyish blooms
 This plant has blooms, and grows by sending out runners to make new starts- I collected several of the starts.
 This is a fast growing creeper that sends out runners and puts up starts. I plucked up a container of this stuff too.
 Deadheaded this one
 This plant is similar to the purple spiked one, but has pink spikes instead of purple.
 This one is like the other that looks like it, but with greener leaves and different color blooms
 This parsleyish looking thing puts out large blue flowers. I pulled some of the spent flowers in hopes of getting some seed
 And spent flowerheads from this ladys mantle.
I also collected a bunch of seeds from the clematis, but I can't remember what the colors are on them, lol. And I got to take home a chocolate iris!
Got the garlic planted in this morning...
 Here's the bed and how much it has settled since I set it up a couple weeks ago.
 Marked off my 1 foot square boxes. Used map pins and some crappy leftover embroidery floss.
 Here's my template to give 6 inch spacing. Made from a recycled bag.

Here's the bed with all the divots done and all the cloves planted in. Rows are 6 each going across- made for the easiest way with the varieties I had and how many I have. Going from the fenceline forward is:
Giant Russian
Leningrad
UP North
Skips 1
Skips 2
Skips 3
Pearl Porcelain- two rows of it
Kankakee Hardneck- three rows of it
Kankakee Softneck
Our earliest luffa was ready to pick, I was a tad leery since it had gotten damaged early..
 Here they all are hanging
 The one for picking is in the background, brown and shriveled up
 Ready for peeling open
 Starting to pull off the peel
 This is what it looks like cut and split open. I already kind of knew that the seeds would not be good in this one, and I was correct in that assumption
The one tomato I planted in the ground- Lemon Boy- while I was gone, it somehow managed to overheave the two tomato cages I had set up to contain it. Did some serious pruning to it and reset the cages. Was able to get at a few ripe and overripe tomatoes finally.
Weeded out a goodly chunk of that whole patch to better expose the fall Top Crop beans for drying- need seed stock for next year :)
Picked what might be the last of the Hutterite soup beans and Gold Marie beans- I now have excellent seed stock for both varieties.
Still got tons to do...
I need to address and weed out the herb garden. The radishes and beets look great. Must resist the urge to pull any of them right now. And a lot of green to pull up and add to fall compost bed.
Rake up under the apple trees. What to do with all the fallen stuff? Perhaps a bottom layer to fall compost bed?
To mow or not to mow? The flowering shag I usually use for need to mow is popping up, but the grass isn't too shaggy yet. Right now I might just leave it because we are on the cusp of frost time- October 15.
Seriously have leaves and needles to rake up for our first bed. It will make for a rather nice top mulch to bury all those garlic seeds.
Thinking about taking fallen or cut brush to weave up the next box or two in rough form. Lordy knows I have enough of all of that.
Need to plant in daffodil bulbs.
Was able to finally pick some milkweed pods today, woot!! I collected about a half dozen heads and now they are drying in a bag :)
I have blooms starting to show up on the fall peas. hooray! Need to pull back all of the containers to the solarium access.
Got in a stack of seeds today, five kinds of peppers and one tomato. Need to package up my trade seed for shipping off on Monday.
Today was some cleanup. Starting in on kitchen cleanup, mostly dishes. Unpacking from being gone- and that's always a thing, hehehe. Picked up the garlic and garden raid that I talked about in the last post. And a bunch of other stuff too.
A couple of sweaters and fall coat- all from Goodwill at damn fine prices. A goodly stack of books, ranging from 49 to 99 cents, most of them being on the low end. A couple odds and ends.
The books reminded me- I need to check in with the local library and see what I can drop off or not. I have a heap of books and such to donate, and I'd like to see them in the best donating sources.
And a fantastically cool board game- Gourmet Challenge. It's kind of a trivial pursuit, only in all things culinary. Origins of foods, eating etiquette, ingredients... And checking out the game of 2 boxed decks, a lot of stuff I know, a lot of stuff I don't. You have to build a cake of layers instead of filling in your pie. And the game was 100% complete- all for 6 bucks.
So, here's the catalog of what I got from my brothers yard.


I also collected a bunch of seeds from the clematis, but I can't remember what the colors are on them, lol. And I got to take home a chocolate iris!
Got the garlic planted in this morning...


Here's the bed with all the divots done and all the cloves planted in. Rows are 6 each going across- made for the easiest way with the varieties I had and how many I have. Going from the fenceline forward is:
Giant Russian
Leningrad
UP North
Skips 1
Skips 2
Skips 3
Pearl Porcelain- two rows of it
Kankakee Hardneck- three rows of it
Kankakee Softneck
Our earliest luffa was ready to pick, I was a tad leery since it had gotten damaged early..


The one tomato I planted in the ground- Lemon Boy- while I was gone, it somehow managed to overheave the two tomato cages I had set up to contain it. Did some serious pruning to it and reset the cages. Was able to get at a few ripe and overripe tomatoes finally.
Weeded out a goodly chunk of that whole patch to better expose the fall Top Crop beans for drying- need seed stock for next year :)
Picked what might be the last of the Hutterite soup beans and Gold Marie beans- I now have excellent seed stock for both varieties.
Still got tons to do...
I need to address and weed out the herb garden. The radishes and beets look great. Must resist the urge to pull any of them right now. And a lot of green to pull up and add to fall compost bed.
Rake up under the apple trees. What to do with all the fallen stuff? Perhaps a bottom layer to fall compost bed?
To mow or not to mow? The flowering shag I usually use for need to mow is popping up, but the grass isn't too shaggy yet. Right now I might just leave it because we are on the cusp of frost time- October 15.
Seriously have leaves and needles to rake up for our first bed. It will make for a rather nice top mulch to bury all those garlic seeds.
Thinking about taking fallen or cut brush to weave up the next box or two in rough form. Lordy knows I have enough of all of that.
Need to plant in daffodil bulbs.
Was able to finally pick some milkweed pods today, woot!! I collected about a half dozen heads and now they are drying in a bag :)
I have blooms starting to show up on the fall peas. hooray! Need to pull back all of the containers to the solarium access.
Got in a stack of seeds today, five kinds of peppers and one tomato. Need to package up my trade seed for shipping off on Monday.
Subscribe to:
Posts (Atom)